
MAddening MAyhem : the Way of the Dragon
This AAR is about a 7 players Dominions 5 multi-player game that occured between the 18th of september 2018 and the 30th of november 2018. This game was organized by alexsa2015sa to test his nation pack mod in a multi-player environment (cf. Alexsa Modpack).
Amongst the nations, there were 2 vanilla nations (MA Bandar Log and MA Ermor), all the others were from the Alexsa Modpack. Here are the players and nations :
1. alexsa2015sa – Ochreil
2. Kakarott – Bandar Log
3. Janohito – Swarmhive
4. Reaver33 – Abolethive
5. Silence – Dragenheim
6. nosy – Ermor
7. Isiloon – Drakonia
This AAR is related in a different way than my AAR on Helheim. Indeed, most of it is written from a player point of view, where I tell about what’s happening, the challenges I met and how I decided to respond to them. There’s a little bit of roleplay stuff to introduce the god and relate the Ascension, but that’s all. Also, I did not put as much effort to add maps, nice pictures and so on … However, it’s still an overview of the game where I focus on the strategic level and only go into tactical details if it is of particular interest.
I decided to do this AAR because of the way I crawled my way into victory that is really interesting and worth relating, and also to honour the loyalty of the dragons that fought for me during the game.
As I provide all the turns, you can review and check everything you want on Dominions 5, even though a number of battle replays are quite different from what they were when the game was played (well, if you have V5.26 and V5.27 of Dominions somewhere, you could get the original battle reports …).
I’m also using a lot of acronyms and if you ever wonder what I mean, here’s a glossary I wrote for one of my other AARs : glossary.
Also, if you liked this one, you may like the 2 other ones I made :
–  Legendary EA – Rise of the Valkyries : a 32 players game with Helheim that I relate in a Roleplay-fashion, with many maps and pictures
–  Confluence Total War – A Journey with the Fay : a game with all 24 nations of the Confluence mod, this is a quick and cheap AAR without many pictures or stories, but you can check it out to see how the Fay and their god came to dominate the world
MA Dragenheim
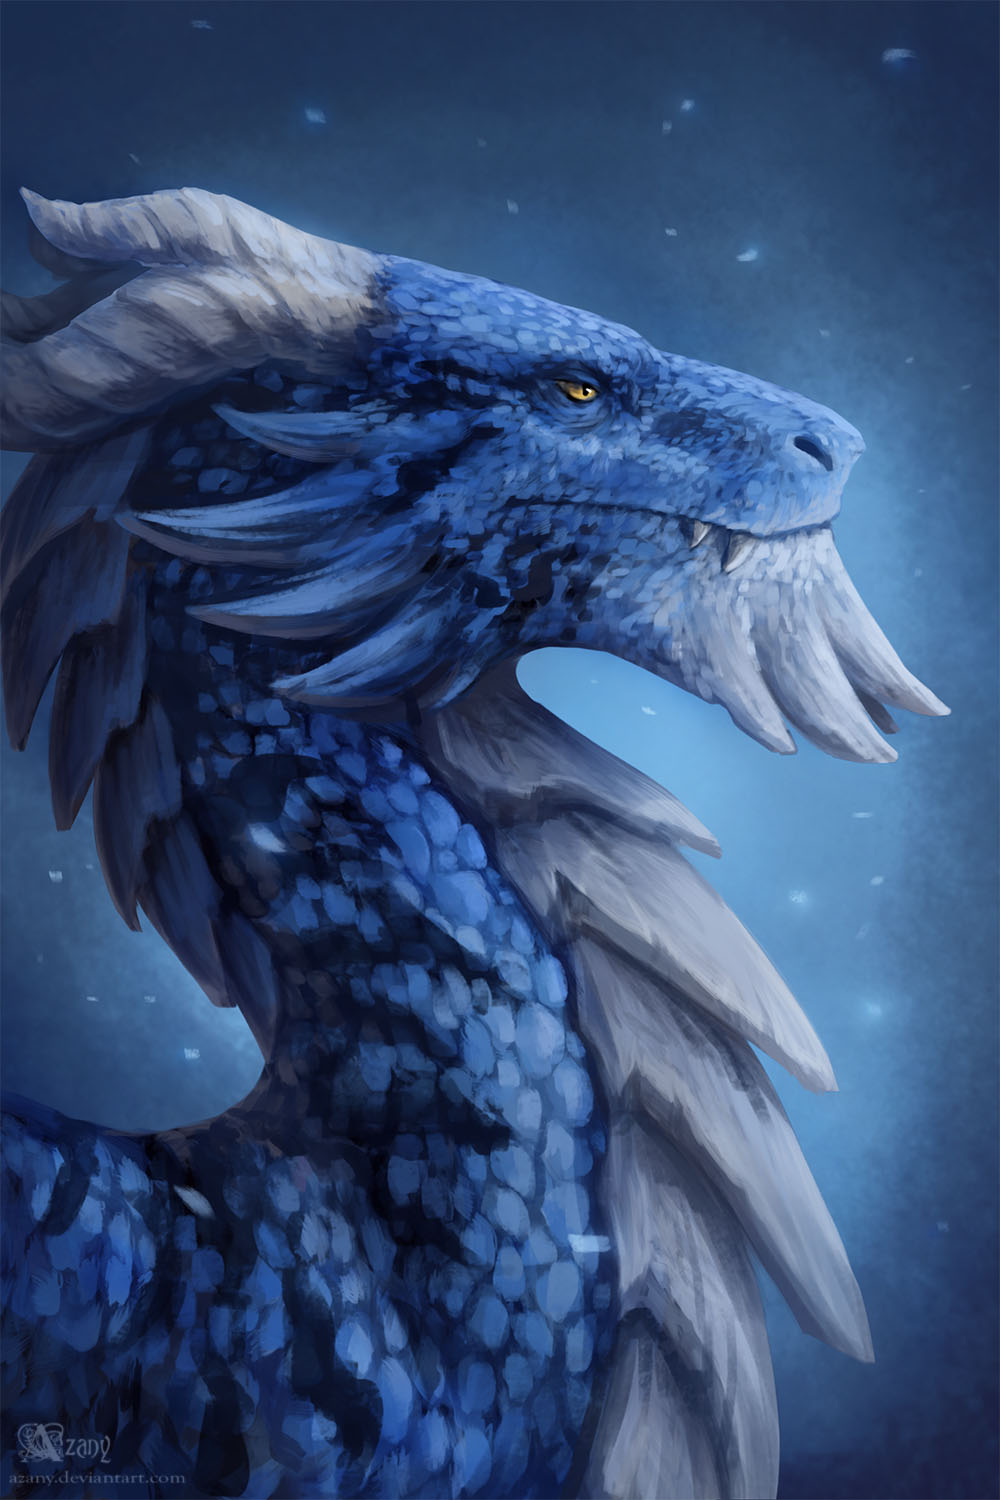
This is a nation of dragons living in cold lands. Blue Dragons, atuned to the frost and unlike their cousins, with a deadly freezing breath.
The nation in itself is easy to grasp as it has really a small number of commanders and troops.


Starting with the troops, there are the Dragenheim Hunters, the Archers and the Warriors, as well as some human serfs.
What makes them strong is that these Size 3 units all have 2 attacks with rather decent damage (an attack from 17 to 19 dmg, and a bite attack for 18 or 19 dmg). They all have a decent armor (14 body armor, and 9 to 20 head armor) and some good HP (22 to 24). Their map move is correct (14) and they all have mountain survival (proved useful several times) and what makes them really better than normal troops are the native elemental resistances (FR 6, CR 10, PR 6).
When it comes to combat stats (att/def), the warriors are clearly better (12 att, 13 def) whereas the hunters and archers are below average (11 and 9). But what really makes the difference is that the warriors have a shield and a long weapon, and in all the tests I made that increased their survivability by a lot compared to the hunters.
Also, the hunters/archers are 30 gold each when the warriors are only 35 gold. So, when I built armies, I focused almost only on the warriors.

They also have cap only sacreds that are monsters. And as such are super expensive (180 gold each) … They are size 4 units with 42 HP and 20 prot, but, sadly, they don’t have the elemental resistances of their smaller brothers (apart from a CR 15). However, when it comes to firepower, they outclass anyone : 3 high damage melee attacks + 1 armor negating breath attack !
Just look : first attack is a magic spear that deals 24 dmg, second a bite for 22 dmg and third a tail sweep for only 15, but affecting the whole square ! The breath attack deals 7 AN cold damage, range 6, lingering 1 turn, and as much as 5 ammo. Enough to deal severe damage to anyone without cold resistance.
And that’s it for the troops (well, there are the human serfs, some human naked archers not worth of any more details).

About the commanders, their scout is also a sacred assassin with a net and a spear. 105 gold apiece is a bit expensive, but may be it could be good if you want to play assassin.

The Seithmathr is the cheap researcher : W1 + 1 random (S/D/N/B), meaning 9 RP for only 85 gold. Their random astral can also make them communion slaves, and their random blood can also be used with that in mind, or as blood hunters.

The Chieftain is a bad researcher and is good mostly for commanding troops (60 leardership, there’s nothing better in the dragenheim army). However, he has a random F path, the only way to access F for Dragenheim.

Then comes the Shaman, a sacred mage A1/W1 with 11 RP and a random (A/D/N/B), allowing a potential A2.

Finally, before the cap only ones, the Sea raider. A1/W1 with a random (A/W/S/D), opening a potential A2 or W2. However he has sailing 50 for size 3 troops. A small bonus that proved quite useful in some cases.

Now, the cap only mages, that are the core of the nation : the Broodmaster and the Bluewing.

Both of them are already very good thug/SC chassis. Sacred, 52 HP, 3 attacks + 1 breath attack, fear 5, flying, 13 natural protection … and native W3 mages and H2 priests. For the broodmaster there’s also a native B1+N1, when the bluewing has A1 + a S/D/N/B random. They also have a nice humanoid chassis that leave space for every kind of magical items.
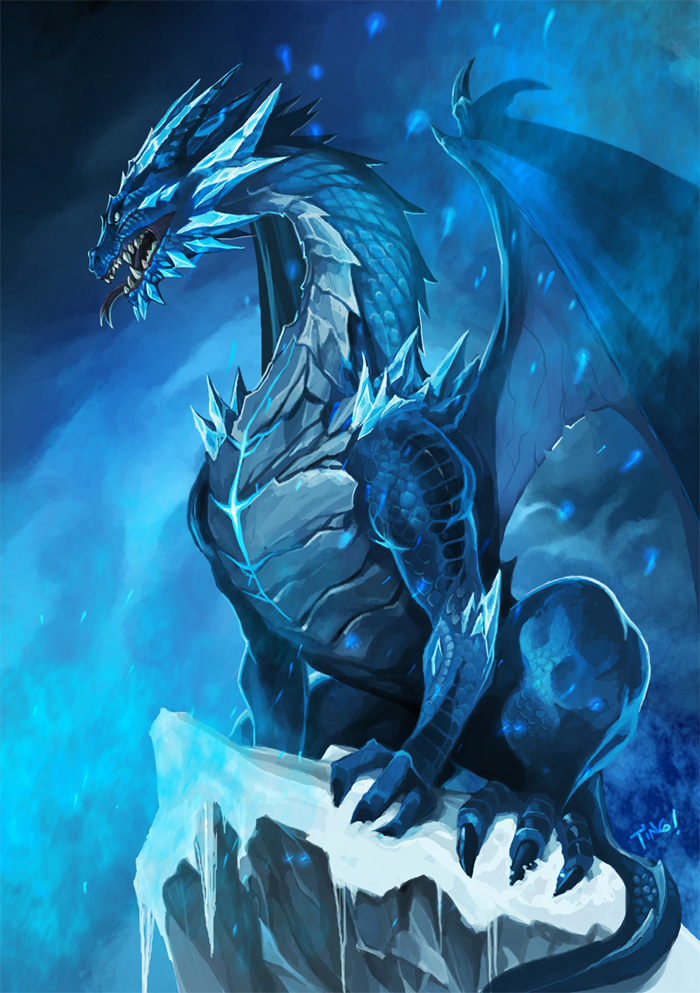
However, here comes the very interesting feature of dragenheim. At Ench 5, there’s a ritual “Awaken Dragon Blood”. W5 and only 16W gems. Only a Bluewing or a Broodmaster can cast it … but when he does it, he transforms himself into a Blue Dragon. A big one, like the pretender chassis.

And there you enter in dreamland … 125 HP, 18 natural prot, 18 MR, W4 mage, and all the things the humanoid form could do, but better : 3 melee attacks and 1 breath attack that has a longer range and affects more squares and does even more AN damage. And of course they are sacreds. Also they can shapeshift into a human form where they get back their initial magic path but with +1W. Can be useful to do some site searching or do some tricks and shennanigans. Last but not least, they fly for 30 map move.
Also, compared to the pretender chassis there are a few differences : they have the Defense Organizer (2) trait, meaning they increase the PD by 2 each turn they spend in a province ! Very good for raids as every raided province will have a free 2 PD. They also have the Tax collector trait, meaning a raid deep in ennemy lines will still collect the spoils.
Finally, both a bonus and potential problem : they have Heretic 5. This means that every turn they spend in a province they kill 1 full candle of dominion, either yours or enemy. So if you put them in defense of your territory they’ll kill your own dominion … but if they attack in enemy dominion, this is a nice ability to reduce it.
So that’s it about Dragenheim … they also have other national spells, death ones that allow to summon some other kind of big dragons. However, those are not sacreds and the spell require a high D level with some crosspath that are difficult to reach (D4F2 or D4N2 or D4W2). In believe that the only reliable way to have them is with a pretender, or to summon a Kokythiad with a random D bluewing (I never tried it in this game).
Metahedron and planned strategy
Gameplay
I chose to play this game because I wanted to have fun, and also because I wanted to play dragons. And as it stands, Dragenheim and Drakonia are pretty well designed to give you that dragon-feeling … When I subscribed, Drakonia was already taken, so I was left with Dragenheim and started to test it.
In my testings, it occured to me that the requirement to summon the big bad dragons was to research Const 4 and Ench 5 (nb : that’s not the case anymore, the mod has been modified to require Const 6). So in order to have the kind of fun I wanted, I built all of my strategy around this : pull out these dragons as soon as possible in the game and build as many of them as possible.
That’s why I built my pretender with Magic 3 (even though in my tests it only allowed to gain 1 turn in research for the requirements …). And I also built my bless around the dragons : that was my goal and the bless was for them and only them. So I had several things in mind : first regeneration looked mandatory for these 125 HP beasts, second, apart from cold resistance, the dragons don’t have elemental resistances (unlike some of the basic troops of dragenheim), third their bite and claws are mundane weapons which can easily suck vs ethereal, and finally these big beasts are privileged targets for soul-slay-like spells and as such need some more MR. Given some of my enemies were astral nations, I expected to meet some ethereal spamming. Also drakonia was a heavy fire nation and I needed to protect my dragons from it …
So all in all I chose that bless : N7 for regeneration, E5 for Fire and Shock resistance, S5 for magic weapons and MR+2. So, unless I wanted some more exotic bless options, a Monolith was, by far, the best chassis, having naturally the N, E and S magic paths.
Also, I knew that in the best case scenario I wouldn’t be able to pull out a dragon before turn 18. That meant I could safely make my pretender dormant.
Finally, I had some more points to use. I wanted at least Growth 2, and as already pointed out, Magic 3 to ensure the earliest possible dragon summoning. However, after taking my magic paths and Growth 2, I had no points left. So I traded Magic 3 for Misfortune 3. Also, Dragenheim troops don’t need much resources, so I could get into sloth. Also, given I had taken Misfortune 3, Order could help to minimize its effect. So I decided to go for Order 2 and Sloth 2.
And so here was Metahedron, Prince of the Hunt, the Far Traveler, King of the Crafts and god of Dragenheim. And, later in the game, one of his titles would shine to the face of everyone …
Roleplay
Metahedron

Metahedron was. He just Was. He didn’t know anything else than being, there, a large monolith standing in the middle of the mountains.
He had been there for ages, so long that nobody remembered when he had appeared. Some said he was even older than the mountains themselves and that these did grow out of them. Others said that the Pantokrator had created him to oversee these lands where he stood.
But Him, the Monolith, had a name. A name of many meanings. He was the supreme geometric being, as not only his rock body was of a nearly perfect shape in the wild mountains, but for those who could see the astral planes, he was too there a thing of incredibly precise shape. In fact his being existed in multiple dimensions at once, perfect, unmovable, the It, That Was There.
When the blue dragons fled the civil war raging in Drakonia, they established their new kingdom in the same region where Metahedron Was, at least where his physical body stood. And soon they recognized in him a being of Power, that they began to worship and from whom they got magic powers.
Metahedron having been there for ages, he knew everything of the wilderness and the wild life. His counsels made him Prince of the Hunt, a title even the Pantokrator recognized in its time. Those who believed the most in him could even develop some regenerative powers, to the wonder of many !
The mages that knew about the Astral plane and the Other dimensions could see the infinite geometric shape of Metahedron and how he roamed ceaslessly the infinite universe. So he had a secret name for them, The Far Traveler, that they used only between initiates. These believers could get an hardened willpower (magic resistance) and the ability to easily hurt beings not made of matter, striking them right into their soul into the astral plane (magic weapons).
Finally, he was intimate with The Shape as his being was a Perfect Shape. As such, the finest smiths recognized him as the one who could forge the most perfect artifacts, the most powerful magic items. Because he Knew all in himself what they where, creating them was for him just a matter of putting into matter what already existed in his multi-dimensional being. As such, the smiths that were in the secrets of His knowledge called him the King of the Crafts. A title he did not necessarily like, but mortals had to find a way to name him …
Also, the believers that came to him for his crafting knowledge could gain an enhanced resistance to fire and lightning. These elements were almost of no danger to whom knew the secrets to bind Magic into Matter …
A Power disappears
When the Pantokrator disappeared, this came as a surprise to Metahedron. That Power had always been there, as He had always been there. It was almost a part of him and its disappearance created something new. He suddenly felt entire dimensions that were unknown of him … and he felt compelled to explore them !
He then threw himself completely into them and explored them ceaselessly, to gather more knowledge and make His being more complete : in every dimension He Had to expand, to create the Perfect Shape and Be There as That Shape. And as his journey went on he started to understand that their was a way to achieve the Ultimate Shape. What else could he wish, He who had seeked the Perfect Shape his entire life ?
But this long travel also made him leave most of his material body. His believers were unsettled and lost : what could they do without him, especially now, without the Pantokrator to Hold the world together ?
So, the Shamans of Dragenheim came around him and started a long ritual to contact him into his other planes of existence. They could catch the glimpse of a thought, a vision. And they came back with that vision to Dragenheim and informed the Elder Bluewings and Broodmasters that a new era had begun.

The War of Ascension was about to begin, evil forces were awakening and even the long forgotten cousins of Drakonia where shouting the name of Tiamat, their leader and pretender to replace the Pantokrator.
The Vision that came with the Shamans was short, but very clear : the Dragons were to dominate the world, not only the Blue ones, but also the surviving Red and Green ones. And they would recover their ancient powers and show the world what it meant to be a Trueblood.
The Vision had a second part, showing Metahedron as the Pillar of the World. The scholars were not sure of what it meant, but it made them certain that He would come back soon from his travel to help his believers to conquer the world.
And so, despite the absence of their god, the Blue Dragons started to march, and prepared themselves to re-awaken the Trueblood that slept into their veins …
About the other involved mod nations
After this long and detailed presentation of Dragenheim, a short summary of the other nations.
Ochreil
A strange nation of 3 eyed creatures living in caves. They always looked odd to me, and I have no idea from where their creator got the inspiration …

In any case, it is a nation of size 2 and 3 creatures with 3 eyes. All of them have at least 2 and sometimes even 3 attacks. The size 3 ones have pretty good damage for so many attacks, ranging from 17 to 20. The sacreds on their part have 2 attacks, including a 29 pierce magic damage… all in all, they are very killy with a pretty decent armor (usually 15). You don’t want to stay too long in close combat with them…
However, it must be considered that, despite the armor and good HP (more than 25 for the size 3), all of their units are quite vulnerable to elemental attacks : -3 FR, -3 SR, -3 PR, but +10 CR. So, resistant to cold but bad against everything else. The sacreds are a bit different with +25 CR and +10 PR but -5 FR and -5 SR. The sacreds also have a 5% built-in regeneration, useful against chip damage.


About the mages, there are a lot of different ones with different paths and crosspaths, but they are pretty much all level 1. Some common mages can get random D2 or A2 but you have to get to the cap only to have a native N2 or W2 and other level 2s. They can also get to some level 3, but this is very rare… They can have everything except blood, but F and S are pretty rare. All in all, their overall low magic path makes them not so good combat casters as there are not many good lvl 1 combat spells. I suppose the crosspaths can help for forging or point buffing, but I was very unimpressed overrall. The best I saw was some skellespamming for the D2 randoms, and flying thugs.
Last but not least, every single one of Ochreil’s units have Recuperation. Still a good thing, making them almost impervious to disease and making afflictions less of a problem. However, their best thugs, the Heralds, are cap only and have to fight commander points with the 2 other expensive mages…
Also, I have no idea if they have national items or spells, I just felt threatened by the troops and sometimes the thugs.
Drakonia

Drakonia was the original EA nation on which a civil war erupted, seeing the split between them and Dragenheim. They are a dragon nation, just like Dragenheim, that can also awaken the True Blood with Fire and Nature dragons. However, in spite of those similarities, there are several major differences.

First, of all, their basic troops are really not as good as Dragenheim ones. A lot of humans – slaves – or mixbloods (humans with dragon blood). All or those are overrall plain average human troops. However, the mixbloods have some of the native elemental resistances we can expect from dragons, with +5 FR, CR and PR, and better stats. As such they should probably be the bulk of the armies when magic comes online … you also have amongst them, humans and mixbloods alike, good 2-handed weapon and dual-wielding damage dealers.


The sacreds are decent but nothing like dragenheim ones. Size 3, two decent attacks, decent armor, good elemental resistances like the mixbloods, they can sure hold their ground but won’t break the game. Drakonia can also recruit dragon riders, that ride small drakes like the ones you can summon in conjuration. These can add some poison or fire breath attacks to your army.


About the mages, they have casual F2 and N2, and can get F3 and N3 with the cap-only mages. Otherwise, they have a diversity of other level 1 paths with everything but S and B. The cap-only mages are like the Broodmasters and Bluewings of Dragenheim, but with fire breath (the redwings) or poison breath (the greenwings). So those are pretty good thug chassis, and they can also be transformed into the big bad dragons of their kind with the right spell in Ench 5.
Swarmhive


The first of the hives. Those are giant ants (from size 1 to size 4) that can have some freespawn. Some of the ants are like normal ants, but bigger, and some elite ones can even carry some weapons and shields. Some humans are also fanatically devouted to the hive queens and can be recruited as sacreds (the only human troops, in addition to some human mages and commanders).
About the ant troopers, they have several specific abilities :
– All of them are magic beings, which makes them vulnerable to a number of spells
– Also, they are all naturally blind and so can’t be blinded, making Solar Brillance a cast anytime spell
– Several troops have the “Pincer latch” melee attack : it’s an acid attack that can destroy armor … can be deadly against a thug and I lost some vine shield (and the vine shield wielder) because of that
– A number of them have the “Mental shock” attack. It’s like mind blast, but weaker : the paralyze effect is really short and the damage is capped by 1. Also, both effects are MR negates. However, the real power here is not to kill things (though it can happen), but in that a successful hit on a mage will interrupt your spells. So when fighting against them Antimagic is almost mandatory … when you have 100+ mental shockers in the enemy army it can be a real problem.
– Last but not least, they have several bonuses for siege, both in attack (troops and commanders) and defense (mostly commanders). That can really turn the tide in a war with lots of sieges.
The nation can also grow underwater with some native amphibious troops (but you need to go UW first).


About the mages, they have some nifty human S1/E1 mages with an additional random element (F/W/A). Those are the workhorse or their communions with many options. Then to the more powerful mages, you can have some random E2, native N2 (the cap only Hive Princess) and S2 (the cap only Hive Queen) too. Amongst those, you can have some random S3, rare E3s and the N2 can be N3 in rare cases too. Most of the leaders also have a “Mind blast” attack, like the agarthan mind blast.
Last but not least, they have a leader with the Mason ability. As such, they can upgrade their fortresses to citadels, with 750 defense and +2 commander points ! This means that if played properly they can spam a lot of research mages …. and given some of their siege defense abilities, their mage forts can be pretty tough to crack.
Abolethive

And now Abolethive. They are also an Ant nation, but entirely amphibious and dominated by Aboleths. This means they are like R’lyeh but instead of triton slaves they have ant slaves. As such, they have all the advantages of the ants, as stated above for Swarmhive, including the better forts with +2 commander points, and some of the best mages of EA R’lyeh. Also, they don’t do in humans, only ants and Aboleths.
Compared to Swarmhive, their mage lineup doesn’t have the fancy human mages but a lot more high level S. Many S2, some W2, the best mage you can get is a A1 + W3 + S3 with some randoms that can push him up to S5 or W5. The other mages have also access to most other level 1 paths but this is usually random. They don’t have any E or B however.

But, the main strength of Abolethive compared to swarmhive, is that they can buy in any fort the “Marmecoleth supplicant”. These sacred ants are natural communion slaves … and given you can recruit a lot of them wherever you want, Aboleth can easily gather huge communions that have access to several paths (W/E/N/D/A and sometimes F). And given they are sacred, they can also get a bless which opens additional strategies.
Being slaves is the main drawback of this nations as they usually get a low morale. The leaders have max 12 morale, and non sacred troops have a max of 11, and the freespawn get down from 9 to as low as 7. Quite vulnerable to fear plays, especially for the easy-to-scare mages.
Bandar Log, Ermor
Well, if you are a dominions player, you probably already know what they can do …

About Bandar Log, I never had a border with them and they were killed very early by Drakonia and Swarmhive, so not much to say here.

About Ermor, well, they kill all of their population to transform them into undead beings … scary freespawn to whoever is scared of undeads. Now that I write this AAR, I have already fought Sceleria in another game and had time to devise strategies to beat them. But at the time of this game, I wasn’t confident at all and wasn’t sure how I would deal with them if a conflict ever happened…
Early expansion (T1 to T13)
In order to get my research goals as soon as possible, the plan was to pump 1 research mage per turn and keep them on research until I could summon dragons.
For early expansion, this meant that I couldn’t recruit normal commanders, and would rely only on independent ones to lead the troops (apart from the very first commander, which became also my prophet).
Also, I needed to build a fort with a lab as soon as possible, and for that I needed the gold. That meant that I wouldn’t have much more than 1 expansion party for several turns, lacking the commanders and the troops.
However, the first scout of Dragenheim is also an assassin and I so sent him to try to get a few provinces by himself through assassination.
The first conquests went rather well and by turn 4 I took a high value province with a lot of gold income. And just next to it, what I couldn’t even dream of : a crystal sorceress province ! My decision was quickly taken to capture it and build my first fort and lab on it. Indeed, not only the sorceresses would help me to research the dragon spell, but I also planned to use them in battles later in the game. If you read my other AAR on Helheim, I had a very bad experience with a thunderstrike communion and it was my opportunity to do that myself.
So on turn 5 I built the Lab and on turn 6 started to build the Fort, and then only on turn 7 started to recruit new troops for a new expansion party.

That same turn, I also met my 3 direct neighbours : Ochreil on the North West, Ermor on the West and Abolethive in the East. I quickly managed to share the land with Abolethive. Also, before the game began I knew that Ermor was one of my worst possible enemy : all his troops have high cold resistance and as such are impervious to the breath attacks and dragons. I knew these attacks would contribute in a large part to the efficiency of my strategy, so I didn’t want to let them live for too long.
As a result, I immediately made a defensive pact with Ochreil : if one of us was ever attacked by Ermor, we would help one each other.
Then on turn 8 I lost both my assassin and my first expansion party (though the prophet survived) and slowly crawled to keep on having a 1 province per turn expansion. As such, on turn 12 I managed to get 9 provinces aside from my capital. A pretty bad expansion, but I expected it : if I wanted to get my dragons ASAP, I had to sacrifice my early expansion and that’s exactly what happened.
However, my economy was decent enough and I could gather an army with some of my sacreds which are monsters. I could then take and claim the Throne of Fortune as soon as turn 13. Just in time to give it as a present to Metahedron that had awokened …
A bold decision (T14 to T23)
A daunting enemy
Ochreil had announced his intention to destroy Ermor as soon as turn 9. At that time, I was far from ready to help him and I could only guess the war from the movements on my border.
On turn 14, Ochreil was besieging a fortress adjacent to Ermor’s capital, and all of my scouts were giving alarming reports on the size of its empire. So I sent ambassadors to every other player to see what they knew about him. The answer on turn 16 was what I had feared : he had had a huge expansion and was as big as 25 provinces, and probably close to 30. Given I had only 15 on my part, that was quite scary.
Also, on turn 15 he took that fortress and looked poised to besiege Ermor and kill him once and for all. Given Ermor gives 9D gems per turn, and given how powerful he already was, I felt him a contender for early victory. Also, I started to study his nation and I understood that he was one of my worst possible enemy along with Ermor.
Indeed, all of Ochreil’s troops have native Cold Resistance, and most of them have many attacks that hit quite hard. His sacreds in particular with a 29 dmg magic piercing attack were particularly scary. What it meant for me was that my dragons would be weak against them : Ochreil’s units could easily kill them and were almost impervious to their breath attack, the most powerful tool in their arsenal. Also his bless included +4 attack, meaning his sacreds would hit 100% of the time.
A reckless plan
So I took some time to think about it. If I chose to expand on my part, using my dragons to crush one or another nation, I would grow, true, but Ochreil would still be bigger than me : they had taken too much advance in terms of expansion and there was no way I could cope with them.
And I saw what was my other choice : stop them before they would be unstoppable. But … given they were already so strong, and given their advantages against me, how would I do that ?
The thing is that I had my crystal sorceresses. Without them I would never have thought about that plan, but they had some qualities that changed everything ! Indeed, Ochreil’s troops have native shock vulnerability, and with a large enough communion, I was pretty sure I could wreck them. However his sacreds had +10 shock resistance … but given their vulnerability that would be only +5. So sure they wouldn’t be vulnerable to the side effect of the spell, but a direct hit would still hurt them bad.
So, given I knew I could win battles, it occured to me that with Ermor and Ochreil at war, it was my two worst enemies using their ressources to kill one each other. So if I could save Ermor, given how Ochreil had beaten him up, I had hope he would continue the conflict until he could have his vengeance.
Thus, I watched closely how the conflict evolved while preparing for the war. My hope was that he wouldn’t take ermor until I was ready, meaning until I had researched my dragon spell as well as Communion (Thau 1) and Thunderstrike (Evo 4).
So on turn 19 he finally started his move to take Ermor’s capital (the only province left to Ermor) and I gave the order to my first Dragon, Vortigern, to attack.
The first objective was to force him to divert ressources from the siege of Ermor : I wasn’t fully ready for my communion (3 more turns were needed) and I hoped Ermor could hold the siege at least 1 or 2 turns.

My attack surprised him and started to upset him as, turn after turn, his plans started to crumble. I quickly had my first 3 dragons active and my raiding began to be a real problem. At first, he decided to forget about Ermor and go after me, but he was confused and the turn after (probaly after seeing my sorceresses waiting for him), he went back for Ermor while another strong-enough party started to counter-attack further north.
So on turn 23 he was besieging Ermor and, to my delight didn’t breach it immediatly. On my part, everything was ready, I moved my army to save Ermor.
Struggle for survival (T24 to T27)
All or nothing
While writing this AAR, I see that this struggle for survival only lasted 3 turns … ! It felt like ages for me !
Indeed, with Ochreil’s armies roaming north and his huge force besieging Ermor, the future looked grim. If I lost that battle, I was pretty sure it would mean losing the game, it was an all or nothing. That’s why every troop I could gather was there, leaving the rest of my territory at his mercy …
In the North he was attacking with a 40 strong army and I needed either to commit all my dragons or send in a real army. But … everything was needed to save Ermor.
On top of Ermor, the scouts were announcing 250 troops when I only had about 120. Also, there were reports of another force of 80 units that was forming close to the frontline.
Things looked desperate, I could only hope my battle plan would work as expected.
On turn 25, even though he had breached Ermor, he knew I would attack him and thus catch him with a script made for the siege. So he decided to fight that battle against me first. And so was the battle of Ivermark.
The battle of Ivermark (turn 25)
In my army, 115 units, including 3 blue dragons (Vortigern, Viserion and Ancalagon), 84 Dragenheim warriors, 6 Trueblood sacreds and, last but not least, 14 Crystal sorceresses + 4 sea raiders with astral magic. That meant a 18 strong air communion to spam thunderstrike.
So the plan was simple : 10 communion master + 8 communion slaves. The dragenheim warriors were mixed with the mages on Hold and Attack Closest to prevent flyers to kill my mages. Indeed, a number of black hawks had been spotted and despite their weakness they could have killed some of my most precious assets.
The dragons were scripted in a conservative way : I was pretty sure that if I threw them on attack rear, they would have been slaughtered by the enemy troops and done no significant damage. So they were to buff themselves, spam quickness on a few warriors, and then only attack closest. Indeed, if they mixed into my troops their vulnerability to the enemy troops would be nullified and they would be able to bring in their power.
Facing them, 199 enemies, including 47 Karakan sacred warriors, 39 black hawks and a number of his regular troops along a few mercenaries. All in all, when I now compare the armies, we were evenly matched in terms of elite troops : my 90 regulars + sacreds were facing only 100 of his ones. Sure his sacreds did hit like trucks, but they could die too. He also had a few mercenary elephants but in theory, against a few Dragenheim warriors, they would be cut to pieces.
His mage core was numerous but of low quality. Most of them had only level 1 paths, and so would not make a big difference, especially given we were still early game …
The first event of the battle was the attack of the Black hawks. As feared, they fell on my massive blob of troops and mages. Thankfully, my blob tactic was efficient and the poor birds were massacred. However … I lost sorceresses to friendly fire. Some dragons and truebloods threw they freezing breath right into the middle of my troops and that proved fatal to 2 of them (but for my main troops with native cold resistance, it was at worst but a scratch).
While the birds were fleeing, my communion was up and started to pound the enemy, starting with the mercenaries and elephants that were powerless to these strikes. As such the 8-strong elephant force was hardly struck and killed on the spot as soon as they reached my frontline.
Then, both armies started to move while some Karakan warriors that had been given the Gift of Flight fell on my rear. There were standing my dragons along with my 3 frail human commanders … the 3 of them died either of Karakan strikes or thunder aoe damage. However, the 7 outflankers where quickly destroyed, struck by thunder or just dismembered by the dragons.
And then the bulk of the 2 armies met in the center. As a side effect of the attack of the flying karakans, some of my troops in the center had delayed their advance. That made my troops form a V in which the enemies started to run : that made them a thin column flanked on their sides by my troops. That was something I had hoped for, and it was happening (but I had not planned at all that the karakan flyers would help me to achieve that !).
In that situation, I had a tactical advantage in numbers, even though he still outnumbered me overrall. That situation was even made easier thanks to the thunderstrikes that were stunning some enemies, delaying them to reach the front and then leaving more time to my troops to kill the outnumbered ones that reached them.
A number of enemies were killed that way until the bulk of his already weakened Karakans reached the frontline. But the inverted wedge was still there to welcome them and in spite of their inherent strength, they couldn’t but be surrounded and die.
On the flanks my dragons could take care of some troops trying to get around. Along with some warriors, they easily contained them and push them to retreat (fear probably helped, as well as the fact that some of them were starving due to wandering into undead territory).
And soon, the enemy army was routed. Thanks to my “Attack closest” directive, most of the mages survived, but that’s that order that allowed my troops to surround the enemy : indeed with that tactic I knew it would help me to win, to the cost of leaving the mages alive.
—
")
So I had won. But to a cost. Even though the battle report shows only 31 warriors dead, the true cost was a bit less favorable. Indeed, I too had to wander into Ermor’s territory where supply was scarce, and that turn of battle was also a turn of disease. As many as 21 warriors, 3 truebloods and 1 crystal sorceress had been diseased, meaning they would die at one point or another.
The overrall gold cost was of 3664 gold for Ochreil (including the mercenaries), but not including the ones potentially lost to retreat. On my part the raw loss amounted to 1415 gold, but with the disease it went up as high as 2795.
So, on paper a large victory, but in the end not so good in terms of attrition. Anyway, even though my losses were higher than expected, the objective had been achieved : Ermor was safe, for now, and I still had a rather strong army. The diseased ones would not die soon and that still gave me something to scare him with.
Survive …
Despite that victory, I only had one army when he could gather 2 to 3 rather small armies to raid me. My objective was to hold at all cost the Crystal sorceress factory, and as such I couldn’t but leave him advance in the north.

")
However, I tried to intercept his main party with my 3 dragons and on turn 26 they met a 37 strong enemy force in Obocte (99), with the enemy pretender. My tactic was to make my dragons wait as long as possible in the rear and then only attack rear. My hope was that most his troops would be upfront when I would fall on the mage core and disrupt it. And, as hoped, that tactic worked … but 2 things went wrong. First, 1 of my dragons quickly retreated, and second, his SC pretender was a bit lingering behind the troops and soon intervened … and so even though the initial attack was an initial success, they were soon surrounded by troops and struck hard by his very strong Myrmecoleon.
All in all I was very lucky : my dragons feeling the danger left the field and none of them died, they only 2 got afflictions and not the worst ones (1 limp and 1 battle fright). And they could still kill 16 out of 37 units, including 1 leader.

However, even though I now see this as a success, given it scared him enough to retreat, at that moment I was mostly aware of these facts :
– I had only 10 provinces left when he had 34 (and ermor 1 or 2 …)
– He still had a stronger army
– My repeated begs for help to other nations were mostly unanswered. Sure Abolethive had said he would help but every passing turn he said he had to check this, or that, … and on turn 27, when I had only 9 provinces he was still unsure whether he would intervene or not.
However, me and Ermor had now very strong ties. That struggle had been for both of us a strain, and we had managed to both survive. On turn 27, it was clear that Ochreil had mostly retreated. And I had now 5 dragons. And I started to counter attack.
Enforcing peace (T28 to T32)
Outmaneuvering Ochreil
After the skirmish in Obocte, Ochreil was feeling overly threatened by my dragons. Fighting one of them was one thing, but fighting 3 or more at once was another. He was also facing a newly raised army of undeads coming from Ermor.
As such, he had stopped his raidings and gathered all of his forces in the fortress of Grey Barrier (104). Gathering such an army was understandable. More than 250 units was something to be accounted for, and if there ever was a battle, he wanted to win it.
However, the place he had chosen for that gathering was like a gift to Dragenheim. Indeed, from there, he needed at least 2 turns to reach his northern provinces … which meant they were free for raiding.
In fact, the geography was in my favor. He didn’t have mountain survival and so the moutain provinces and mountain passes completely hindered his ability to move. And while my dragons were free to raid, my main army was still up and had almost recovered its former strength : a now 20-strong communion thunderstrike party along with 85 warriors and truebloods. Sure, some of them were weakened by disease but it’s likely that the enemy didn’t know it.
So the 3 raids fought turn 28 were a success and one of them even destroyed a small raiding party. Turn 29 saw 4 other raids, taking all 4 provinces when he only took 1 with a small party of sacreds. Ermor on its part had taken back his full cap circle and was already teasing the other Ochreil’s positions.
That turn 29 saw also my main army raid just close to his northern fortress. This way, I was threatening to take it and I was pretty sure he would send his main army to help there. That wasn’t my intention however, I only wanted to make him lose time. Indeed, if I ever had done that, I took the risk to let him take my Sorceress factory and I certainly didn’t want him to do that.
Also, turn 29 Abolethive told me that Swarmhive was attacking Drakonia, and as such he felt free to, finally, join our struggle against Ochreil.
So by turn 30, my plan had perfectly worked. Ochreil was indeed losing time to move north to save his fortress from … an attack that never occured. I had outplayed him and whatever happened gained time. But with the attack of Abolethive on his flank, Ochreil knew he was now in a tough situation and I was really wondering what he would do.
The Spoils of War
And this turn, I received a desperate message from Drakonia begging for help. He was of dragonblood and I felt compelled to answer him. So I studied the situation carefully, and my reasonning was that I had, some way, beaten Ochreil. He knew perfectly well that in a 3 vs 1 he was fucked, and given the large territory I had conquered, I felt I could propose a truce.
So at that point, my plan was very simple : make peace with Ochreil and move south all of my dragons along with a new army, to raid as much of Swarmhive as possible. Also, I had opened another border with them on the north of my empire, and I could then attack him on both sides, and hopefully join forces in the middle, making my empire fully connected from north to south.
But for that I needed Ochreil’s agreement. To ensure it, I defined the new borders so that he could retake 2 provinces. I hoped he would feel like he gained something in the process, and wouldn’t try to negociate.
All in all Ochreil was now down to 20 provinces, and me up to 20 too. Ermor was alive and healthy (as much as undeads can be…), and with Abolethive on his flank, Ochreil had other other fish to fry. He had every reasons to accept my truce and the new borders.
I also felt a bit bad about it as I hadn’t told any of this to Abolethive. I hoped he wouldn’t feel betrayed, leaving the coalition just after having pushed him into it …
In any case, when turn 31 arrived I was still worried : would Ochreil accept my proposal ? His army now gathered in the north looked stronger than ever, 400 men strong and even for my main force difficult to beat. Sure I was on the verge of having my 7th dragon out, but would it be enough ?

Turn 32 was the final relief : Ochreil accepted the truce and a NAP-1 : I was now free to expand against the ants. Against them, I believed I didn’t need any crystal communion : dragons and warriors would be enough. And so that turn I sent a declaration of war (“Your actions against our cousins are unforgivable. Dragonblood is sacred and must be protected at all costs !“) and gave my orders to start a large scale invasion …
Also, whatever happened, I believed I had to keep my big crystal army ready, as a constant warning to Ochreil … that’s why I did let them on the border for some time.
Finally, I told to Abolethive about the truce and suggested him to do the same : let the undeads and the 3-eyed cavemen fight one each other !
Draconic insecticide (T33 to T41)
Textbook conquest
The first turn of the war I met no resistance. 4 provinces were taken at once and the Throne of Bureaucracy on our border was sieged and breached in the same turn. As it stands, this throne had another good bless to help me mitigate my Misfortune 3 (now 2 with the throne of Fortune). Indeed, it gave a +1 order on my dominion, raising it to Order 3. That was perfect and I couldn’t have asked for more !
And while I was storming his fort I sent my remaining dragons to take one juicy province that had unveiled my new scouting. Indeed, I had spotted there a “Stalker”, an assassin that I knew to be only recruitable in a province with a very specific magic site : “The Lost Kingdom of Elludia”. A very good site that gives 3S + 1D, and allows the recruitment of both Stalkers and Elludian Moon mages. And, as it stands, the Elludian Moon mages had a very interesting crosspath S/D and could even develop a random E1 or B1. The E was something interesting for me given my only access to E was Metahedron …
3 dragons took the province that was even better than expected with an additional site providing 2S per turn. And so, now that I had taken the throne I could push further, especially given I was not seeing a single enemy army coming to defend these lands.
On turn 35 I took 3 additional provinces and prepared to siege an enemy fort on the coast. Here, the Sailing ability of the sea raiders proved very useful, allowing me to ferry a lot of troops on the battlefield. And the enemy looked rather on the defensive, probably hoping to take down Drakonia before he could turn on me.
And so turn 37 I captured 5 provinces and besieged 2 fortresses all at once. And that very same turn, Swarmhive’s main army was beaten by Drakonia (more below) and Abolethive laid siege to his capital … I believe this must have been quite a blow to him as any hope to do anything more in this game suddenly vanished.
However, he still had a large force in one of the fortresses I was coveting (Delca prov 32), as well as a large defense force inside Swarmhive itself. And, as soon as turn 38, I had that Delca fortress besieged and breached.
Drakonia finds his own way
At that point, my scouting was still a bit limited and so I didn’t know much of the war between Swarmhive and Drakonia. But with a steady scout recruitment I was on the verge to have a full map scouting and it’s from that effort that I was able to catch the decisive battle between the ants and the dragons.
I don’t know exactly how this happened, but Drakonia had managed to corner his army in one of his former fortress. On turn 36, a 400 strong Drakonia force had breached that fortress that was defended by 420 ants, every single one of them sacred. However, most of them were rather weak and only 100 could be considered dangerous. Swarmhive had a decent combat bless with +2 Att, +2 Def, +4 Str and +5 elemental resistances (fire, cold, poison), enough to make his best troops quite good, but not enough to make his weakest troops decent.
Also, Swarmhive only had 2 mages while Drakonia had sent a full force of 24 mages, along with his pretender Supercombattant (Tiamat the Drakon). Without Drakonia’s battle magic, I believe Swarmhive would have won, though with a number of losses. Also he had chosen to fight into the fortress, which I believe was a mistake : he would probably have overwhelmed Drakonia otherwise (most of drakonia troops were trash too, and Swarmhive elite were the best units on the battlefield).
And so began the battle on turn 37. Swarmhive started with a barrage of Mental shock attacks that disorganized the dragon line, making them enter the breach in confusion. The first to enter were the first to die and quickly the Elite ants closed the breach and raised a shield wall to prevent anyone else to enter.
Drakonia sacreds entered the battle but despite their strength couldn’t resist the might of the enemy best warriors. And so, at this point, it looked rather grim for Drakonia. But on the other hand, the mages had been raining fire on the rears of Swarmhive … especially on his weaker troops, that were quite fragile. And they had been dying like flies …
And even though for the ants the battle looked on about to be won, the elite Homo Godborns discovered that all their supporting units had been slained. And even though they had started to surround the enemy pretender, and were probably on the verge to kill him, the death of their fellow and the sight of that scary beast were the nail in the coffin.
They could have won, they chose to run for their lives … and as such they settled the death of Swarmhive. Despite 200 deads, Drakonia now had free hands to reconquer his territory. Despite my help, they had found their own way, they had cast down the beast by themselves.
Apocalypse in Delca (turn 39)
After besieging the last army of Swarmhive, I had no intent to linger and launched the assault immediately. Indeed, I had gathered there 6 dragons (out of 9), supported by 40 warriors and 8 mages.
Against them stood 120 weak troops along with no less than 40 battle mages … And those were not any mages as all of them were E1/S1. And if A1/S1 is the path for a powerful thunderstrike communion, the E1/S1 is perhaps worst, as it opens the ability to spam Gift of Heaven.
And that was the only strategy he put in place. As soon as the battle started, tens of meteors began to fall from the sky on my troops. One of my dragons, the young Thessera immediatly succumbed to the strike of 2 direct hits while a number of warriors died crushed under the rocks.
Soon after, the 5 surviving monsters took off while a huge number of stone missiles were falling on both Dragenheim and Swarmhive troops, killing both of them in scores. And then started a massacre.
The Blue dragons began to cut to pieces the enemy wizards one after the other. The wizards knew that their only chance was in killing the beasts before they would reach them … but the very boulders falling from the sky were very imprecise and their numbers was quickly thining. However, in a last display of heroism they managed to hit the young Akatlax twice, crushing his skull and leaving him dead on the field … But, despite injuring another dragon, this was their last action.
")
Frozen to death, dismembered, crushed to puddle, there was not much left of the Swarmhive army and they soon gave up and routed.
Dragenheim had won, but for the first time Dragons had been killed. They were not the gods they thought they were, after all …
It is interesting to note that Liquid Body helped them to survive a direct hit from a meteor. Even though the battle log shows full damage, I could notice they only took half damage. I suppose the gifts strikes are considered blunt damage in that regard.
Abolethive deals the fatal blow … in blood
After the destruction of the last Swarmhive army in Delca, it was not long before Abolethive would finish them and take their capital. However, he took his time, probing the enemy defense and reinforcing his assault party. And it’s only on turn 41 that he finally went in.
Swarmhive had 24 mages and about 260 troops to defend his capital. I believe the initial Aboleth attack was unexpected and so he had sent his best battle mages to try to stop me. However, he still had the means to throw a number of Gifts from Heaven and other funny things. He also had the Vafur flames burning in front of the gates.
On its part, Abolethive was obviously concerned and had sent no less than 45 battle mages supported by 71 communion slaves (one of Aboleth very good national unit). For the fight itself he could count on 200 warriors, including 130 rather good sacreds.
The start of the battle saw a number of battle enchantments. On the side of Abolethive several nature spells : Howl, Relief and Foul vapors. Indeed, ants have native poison resistance, so why not ? On Swarmhive’s side, only Heat from Hell, to burn even more the enemy if they managed to get past the Vafur flames …
Abolethive relied on some skelespamming, ethereal bodies and soul slay. Swarmhive on its part tried again to send many Gifts to his enemy. And during the first part of the battle, Swarmhive was doing quite well : his units held the gate while a LOT of enemies were burnt by the Vafur flames. Also, at first, the gifts were well aimed and killed some of the Aboleth slave ants.
However, the battle started to turn tide when the meteors got more and more off target, killing more friends than enemies, and this even though he had cast Wind Guide to reduce that side effect. As such, the line holding the gate broke and the surviving elites of Aboleth entered the fort. Also, the wolves from Howl were quite a pain to the Swarm and contributed to limit the effect of their mages.
In the end, 2 mages supported by a few ants kept on fighting for a few turns, showing that less Gifts and more “mundane” spells could have, possibly, won the battle.
The battle report shows that losses were very high. All of Aboleth supplicants (the communion masters) were killed, most probably out of being overused by their masters. I calculated that his losses were worth 10.000 gold … more than what had lost swarmhive (8400). However, I I know they both have freespawns, so these costs are probably a bit lower.
Anyway, with this victory Swarmhive was no more. He still held 1 small fortress up the coast into Drakonia’s territory, but he had nothing else left … nothing … apart the most famous hero of this game. “Antilochos”, the Myrmec Prince was still alive and even though his people had been crushed, he would fight to death. As it stands, he would keep on raiding there and there until his very death on turn 57, no less than 16 months after the loss of his capital !
Mother Oak betrayal
In my diplomacy with Drakonia he told me once that he intended to cast Mother Oak. On my part I was also thinking about it but was waiting to get 100N gems to do so. However, I was a bit annoyed to put this between us and I didn’t tell him anything.
On turn 40, the first global of the game went up : Abolethive had cast Stellar Focus pushing his Astral income to probably 25/30 astral pearls per turn. That very same turn, I had finally reached 101N gems … and I saw that as an excuse to cast it without warning my ally.

And, indeed, that was quite a dirty betrayal given he had tried to cast it the very same turn … but with less gems … I don’t how much he lost but his message the following turn was of a deep disapointment. I answered that I did that only because of Stellar Focus, that it had to be done and so … a vague excuse when I knew perfectly well I was going against his plans.
Thankfully, he didn’t hate me for that and we could keep on our alliance for most of the remaining game.